Part 4: Terraform - Configuration Basics
This is the fourth part in the Terraform series.
The previous three parts are at the links below if you wish to read them:
- Part 1: Terraform – Getting Started
- Part 2: Terraform – Fundamentals
- Part 3: Terraform – Installation
In this post, we discuss configuration and configuration files as a key step to utilizing Terraform. We will also deploy and destroy our first infrastructure using Terraform.
- Configuration
- Side-note: Text Editors vs IDEs
- Configuration Formats
- HashiCorp Configuration Language (HCL)
- Combining it all
- Steps to deploy configuration
- What's next?
This section assumes basic familiarity with data types as Boolean, strings, integers, and the like. And a basic awareness of cloud terminologies such as virtual private cloud (VPC), subnets, EC2 instances, etc. helps. I have tried to make it accessible for those without that background, but if you have it, you'll get the most out of it.
Configuration
At its core, configuration is the process of assigning value(s) to a parameter, an entity, or an element. This could be as simple as assigning a Boolean value where you turn a setting on or off. Or it could be as complex as assigning multiple values depending on existence of evaluated conditions.
There are numerous configuration formats and standards to achieve such an objective. Some configuration formats are optimized for machine readability. Whereas, others are created with intent to be easily read by humans. Below, we'll see this in action at a very high-level.
Text Editors vs Integrated Development Environment (IDEs)
Side-note: Text editors vs IDE (Integrated Development Environment). For now, you can manage writing these configurations in your preferred text editor (such as Notepad++, Sublime, etc.) These are “smart” enough editors to detect syntax highlighting and allow you to become familiar with keywords used in each type of configuration format.
If you ever get to work on larger projects, it may make sense to download and install Visual Studio Code or other IDE of your choice and install the HCL extension. Getting an IDE at this stage is overkill and like using a Katana to chop onions. We're not going to go so fancy so fast.
Feel free to skip discussion of the other configuration formats if you wish to jump directly to the one format we will use: HashiCorp Configuration Language (HCL).
In my view though, reading this section will provide you with important context to understand HCL's place and the drivers for its being.
Configuration Formats
Let's take a look at examples of some configuration formats out there.
- XML (Extended Markup Language) - This format is used in multiple implementations and systems. But, as an example, if you have operated a centrally managed Cisco, Fortinet, or other VPN, you are already intimately familiar with it. It allows us to tell a client machine if it should prompt for certificates, what the description of the VPN should be, if the client machine is allowed to access local resources while on VPN, and so on.
<ike_settings>
    <prompt_certificate>[BOOLEAN_VALUE]</prompt_certificate>
    <description>[STRING_VALUE]</description>
    <server>[STRING_VALUE]</server>
    <enable_local_lan>[BOOLEAN_VALUE]</enable_local_lan>
</ike_settings>
XML configuration files are saved with .xml extension.
From a readability perspective, as you can observe, XML can be wordy and long. We have to state the name of one parameter or element twice. That is to open it using <>, assign value to it, and close it using </> notation.
If we wanted to add comments in an XML configuration, we'd use something like:
<!--This is a comment-->JSON (JavaScript Object Notation) is a means of setting up configuration in a very human readable, key-value pair method. As the name implies, it is more intuitive to the way we think of things in the world i.e. objects.
JSON is limited in the data types it allows us to use. It can support strings, numbers, boolean, null, object, and arrays. If we want to have dates or functions, JSON will not be our go to format.
Take a look at this configuration of Mountains below. Note the usage and placement of brackets, quotes, braces, colons, and commas. Also note the indentation practice in JSON. We use two or four spaces for indentation and no tabbing.
{
  "Mountains": [
    {
      "Name": "The Lonely Mountain",
      "Location": "Northeast of Mirkwood",
      "Alias": "Erebor"
    },
    {
      "Name": "Mount Doom",
      "Location": "In Mordor",
      "Alias": "Orodruin"
    }
  ]
}
JSON files are saved with .json extension. And what if we wanted to add comments in JSON? We'd have to create a new key and assign a value to it. There is no support for inline commenting.
{
  "Comment": "This is a comment"
}- YAML (YAML Ain't Markup Language): This configuration format is also optimized to be easily readable to humans. In fact, it is even more so than JSON. It is a superset of JSON in that if we have a JSON configuration file, it is convertible in to YAML. But YAML has distinct syntax, offers expanded feature sets, and different requirements.
The same Mountains configuration we have in JSON above would look like the following.
--- # This is a comment
Mountains:
  - Name: The Lonely Mountain
    Location: Northeast of Mirkwood
    Alias: Erebor
  - Name: Mount Doom
    Location: In Mordor
    Alias: Orodruin
Notice the differences with JSON. No brackets, braces, or quotes. YAML is based on whitespace delimiters which makes it easier on the eyes. And it has built-in support for inline commenting.
YAML is case sensitive and the configuration file is to be saved as a .yaml extension.
We rely on spaces for indentation and need to maintain consistency regarding number of spaces under the parent (Mountains) so the attributes of each child can be grouped correctly. Otherwise "invalid syntax" errors that we know and don't love will popup.
HashiCorp Configuration Language (HCL): With Terraform, the most commonly used structured configuration language is HCL.
When creating HCL, HashiCorp aimed to achieve a reasonable trade-off between machine readability and human readability while providing capability to support multiple data types, functions, as well as the ability to pull in and use pre-existing modules. HCL is now on its version 2.0 which is creatively named… you guessed it, HCL2.
HCL configuration looks a lot like JSON in its appearance.
From here on, we will keep most of the examples geared towards AWS cloud since that’s where we will be building up to deploy our overall project.
An HCL configuration is made up of:
Arguments: this is how values are assigned to a specific argument name. For example:
Name = “Mount Doom”
cidr_block = “172.20.0.0/16”Blocks: contain content that in most cases describes an object. A block has a type, can have no label, a single label, or multiple labels, and it has a body containing arguments. A block can possibly have children or nested blocks with in it.
This is the basic structure of a block:
type "label" “label" {
# body
identifier = “expression”  # argument
}Comments: Support for inline commenting
#Single line comment goes here
/Single line comment goes here
/*Multiple lines of comment go in here */Variables: Just as in regular programming, the use of variables in HCL allows for flexibility. We will see this in more detail in later parts. For now, just keep in mind that these exist.
A terraform block specifies which provider plugins are required. We discussed provider plugins in part 2. Review that if you need to.
# Here is where we declare the required providers
# Providers can be more than one based on what we're trying to do
terraform {
  required_providers {
    aws = {
      source  = "hashicorp/aws"
      version = "~> 3.0"
    }
  }
}
If provider plugins are not declared, Terraform will not be able to manage any infrastructure. In recent versions, this hard requirement for explicit declaration seems to have been relaxed but we’ll stick to it as a requirement to start off learning with the right coding mindset.
Next, we use a provider block to define how to connect to the environment. The provider block specifies the AWS region of our choice and supplying the credentials that allow Terraform to connect to AWS via its API.
# Here we have a provider block configuration
provider "aws" {
  region     = "us-east-1"
  access_key = "my-access-key-value"
  secret_key = "my-secret-key-value"
}
Where do we get the access key and secret key values? Read on.
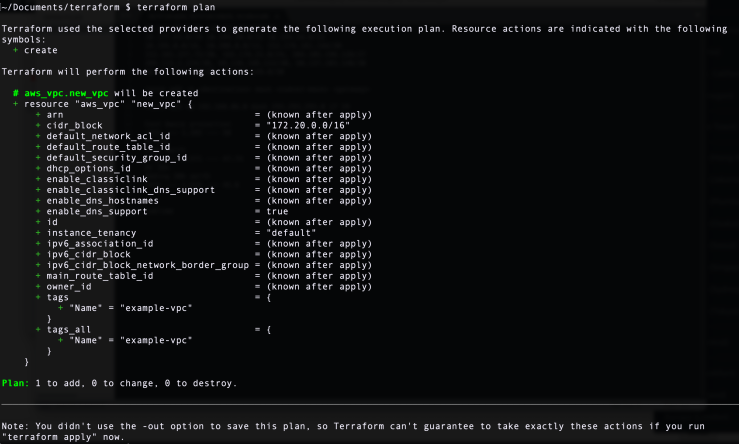
After this, we can start defining resources that the provider we utilize is aware of. If we were to describe a Virtual Private Cloud (VPC) resource in AWS, it would look like the following.
# Here we are describing a specific type of aws resource
resource "aws_vpc" "new_vpc" {
  cidr_block = “172.20.0.0/16"
  tags = {
    Name= “example-vpc"
  }
}
The invocation of provider aws plugin in the terraform block allows us to use type resource in describing our VPC which is a member of known AWS resources along with AWS EC2 instances, AWS S3 buckets, subnets, etc.
Combining the blocks we have so far:
# Here is how we declare the required providers
# Providers can be more than one based on what we're trying to do
terraform {
  required_providers {
    aws = {
      source  = "hashicorp/aws"
      version = "~> 3.0"
    }
  }
}
# Here we have a provider block configuration
provider "aws" {
  region     = "us-east-1"
  access_key = "access-key-value"
  secret_key = "secret-key-value"
}
# Here we are describing a specific type of aws resource
resource "aws_vpc" "new_vpc" {
  cidr_block = "172.20.0.0/16"
  tags = {
    Name = "example-vpc"
  }
}
Ok, we have a basic HCL configuration.
How do we implement this in AWS to create the virtual private cloud called "new_vpc" with an IP address space of 172.20.0.0/16?
I'm going to layout these steps in detail so even busy people can follow them. If you are already familiar with it, you may not get much value by following it to a tee.
Step 1: Get a personal account or a playground account in AWS if you don't already have one. Set it up for multi-factor authentication as a security precaution. Sign up for an AWS account on their website.
Step 2: In AWS, search for IAM in the "Search for services, features, blogs, docs, and more" box.
- Click on Users and Add users.
- Type the username and check "Access key - Programmatic access"
- Click "Next: Permissions"
This is the account Terraform will use to contact the AWS API and execute infrastructure actions .
- Click on "Attach existing policies directly" and select AdministratorAccess permissions policy
- Give it a tag if you desire or click Next Review

- Click Create user
Make a note of the access key and secret key. You will only be able to access the secret once. So, make sure to copy and save it in a secure location.
Use the access key and secret key values to edit the provider block. We'll discuss secure ways to manage secrets in later posts. If you wish to change AWS region to your side of the world, do that.
# Here we have a provider block configuration
provider "aws" {
	  region     = "us-east-1"
	  access_key = "access-key-value"
	  secret_key = "secret-key-value"
}
Step 3: Prepare a working directory on your computer. It can be anywhere. For demonstration purposes, I've setup shop in Documents/terraform folder.
Step 4: Open up a Text Editor. I use Sublime on a Mac. The simple steps to install Sublime Terraform packages for syntax highlighting are at this link here. If you're going to use Notepad++ on Windows, look for a Terraform package online and add it.
- Copy the full code you have prepared above and paste it in your text editor.
- Save the file as simple-vpc.tf
It will look something like this:
Step 5: Open up a Terminal application if on MacOS. Alternatively, open Command Prompt or PowerShell if using Windows OS.
Step 6: Position your Terminal to be in the working directory. Validate by printing the working directory with pwd. Type ls to verify you have the simple-vpc.tf file in this directory.
cd Documents/terraform
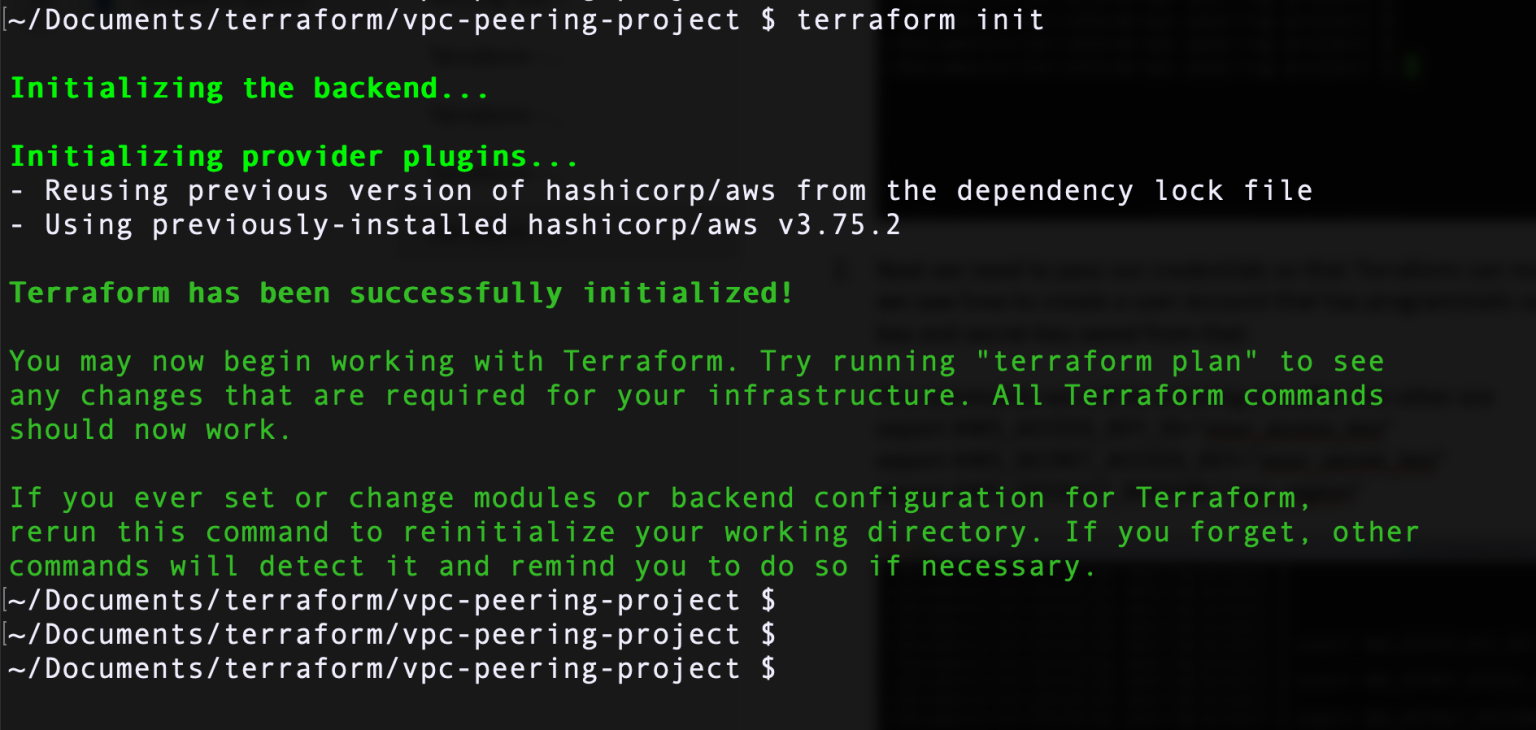
pwd
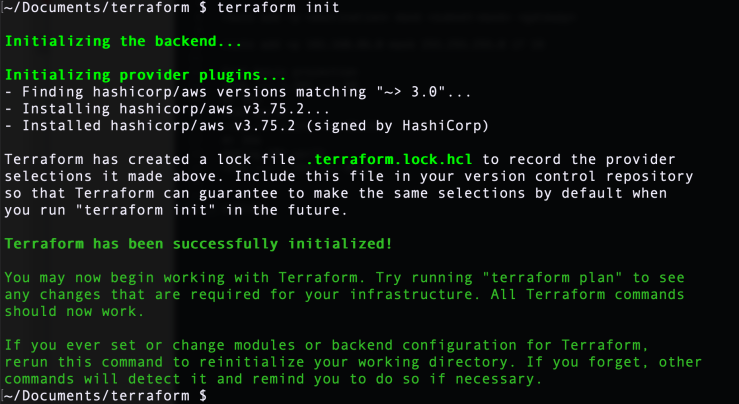
lsStep 7: Issue a terraform init command. Terraform will initialize the backend which we noted is used to store persistent state data. It will look for and install the provider plugins we have specified. Once done, it will tell you that it has successfully initialized.
Step 8: Type ls command again. Do you see a difference?
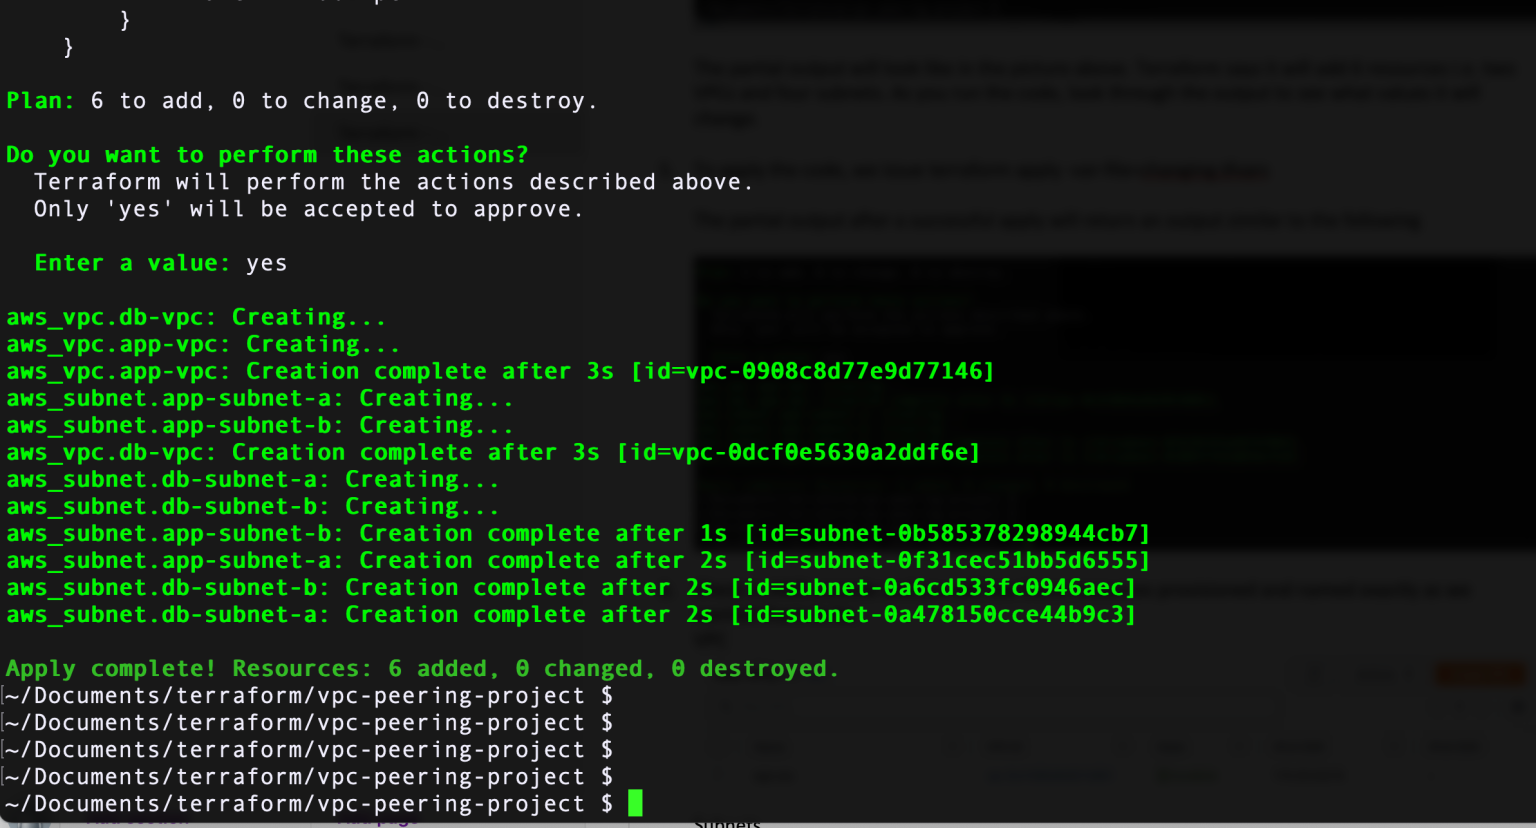
Step 9: Next, issue the terraform plan command. During this stage, Terraform will plan what to do and propose what it is going to do - how many things it is going to add, change, or destroy. The decision to accept and apply these proposals is yours.
Step 10: Next, do the terraform apply command. Terraform asks you one more time to confirm by typing "yes." Once you do that, Terraform gets to work and starts making the changes.

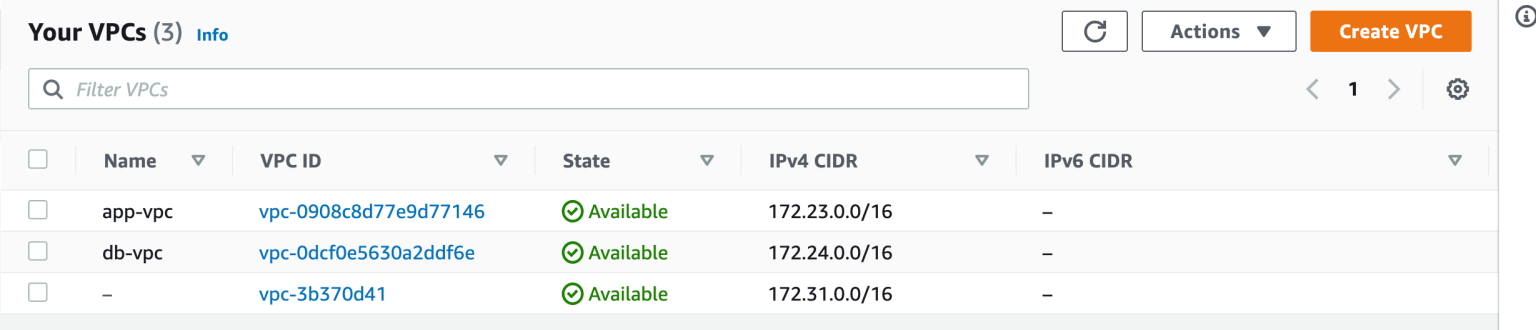
Step 11: At this point, head over to AWS management console and check if the VPC has been created. And sure enough. it's there. Look around the AWS console. You will see other resources associated with this VPC implicitly created as part of the process.
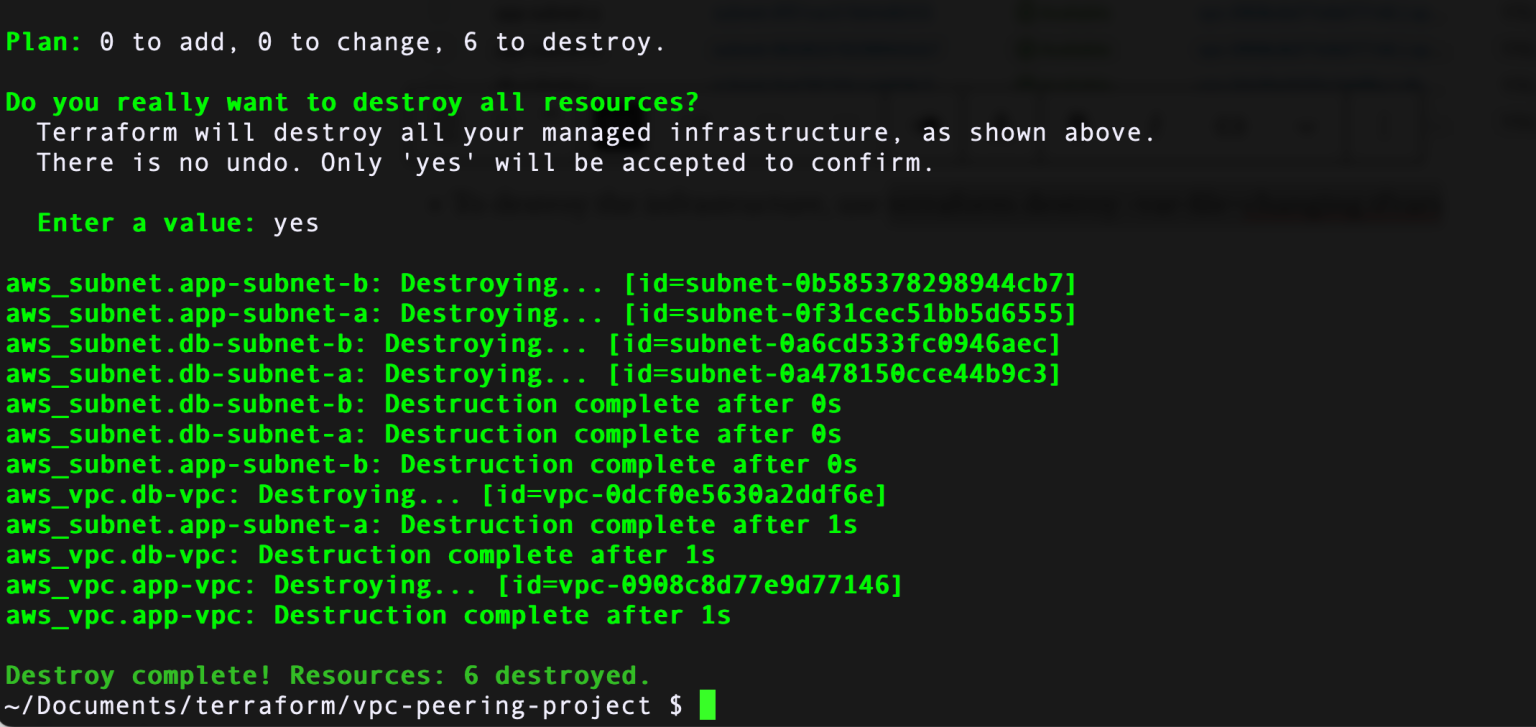
Step 12: To delete the newly created VPC, issue terraform destroy command. When you want to destroy infrastructure for whatever reason, Terraform essentially screams "There is no undo" and asks you to confirm by typing "yes" Read line by line what changes it is suggesting to make. Once confirmed, destruction process commences.
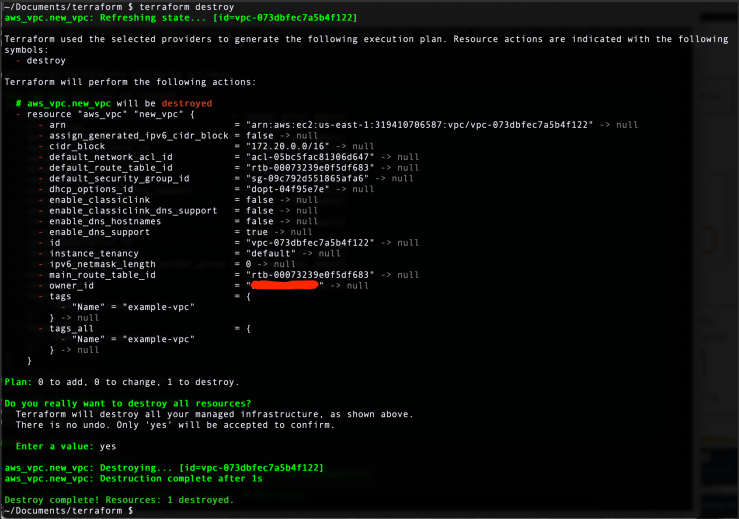
Step 13: Head over to AWS management console and verify if the VPC is deleted. The new VPC is gone and only the default VPC remains.
Step 14: Type ls command.
~/Documents/terraform $ ls
simple-vpc.tf	terraform.tfstate   terraform.tfstate.backup
Observe that there are a .tfstate and .tfstate.backup files. As we saw in previous parts of this series, the location where state data is stored is determined by the backend configuration. The default backend configuration uses local directory. Therefore, it stores the state data in the working directory. Also since we are using only the default workspace, it is saved in a single file with file extension .tfstate
Deploying infrastructure with Terraform is that easy!
I'd restate though to be mindful NOT to do any of this in production environments.
Terraform makes creation and destruction of infrastructure components very trivial. This makes engineers very effective even at being dangerous. Follow good judgment and a sound change control process.
What's next? If you have observed closely, we have transgressed a few best practices for basic learning purposes and to keep flow in grasping the fundamentals.
For example, saving access and secret keys in a text file is just simply inviting a security breach. How should we deal with secrets and credentials appropriately? We have options to use either environment variables or store credentials in encrypted files which we can call upon when needed to execute. We will see these in later posts.
Another item to take note of is that we have defined the terraform, provider, and resource blocks in the same configuration file. This might work since we have here a limited number of configuration lines and resource definitions. But in the real world, our configs are going to be long and complex. How can we handle this more efficiently?
We will see how to make use of a proper modular organization in which we put the terraform block in its own versions.tf file, provider block in its own provider.tf, resource files according to their own categorization such as network.tf, security_groups.tf, etc. Then coordinate dependency calls upon each file to deploy and modify the infrastructure as needed.
In addition, to achieve flexibility and a well-managed deployment, we will see how we can use environment variable definition files. What will this help us with? When we need to deploy a new environment with similar settings, we only change the environment variables file and reduce the number of points we have to touch during each deployment. Thereby reducing risk of human error which is one of the selling points for automation.
Tags: terraform
← Back home